


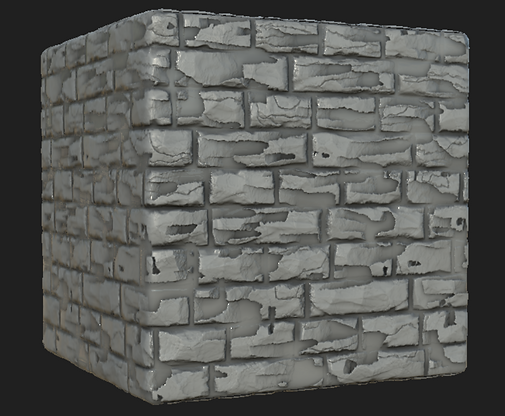
Brick Texture
This was one of the procedural materials I made using Substance Designer for the Fundamentals of Substance course through CGMA (CG Master Academy).
Programs Used: Substance Designer
Reference

Initial Pattern

To make the initial brick pattern I started with 2 variations of a square Shape node and refined them with the Blur and Histogram Scan nodes. By plugging these into 2 different Tile Sampler nodes and copy blending the results I was able to achieve a subtle height variation in the individual bricks that looks like this:

3D view

2D view
From there, I used Flood Fill to Gradient nodes to create some sloping/jutting height variation.

Carving out the Bricks

Using multiple Slope Blur Grayscale nodes with various noise inputs I was able to really carve out the individual brick shapes giving them the same aged/roughed up quality of my reference.

Main Damage

To achieve the organic creases and divets from the reference, I started by using a Tile Sampler node to create really stretched out ovals. From there, I used a combination of Directional Warps with different perlin noise inputs, Edge Detect, Flood Fill & Flood Fill to Gradient, and Slope Blurs to get a good amount of height variation.

Tile Sampler

Result
After duplicating everything and adjusting the values, I multiply blended everything together to get this result:
Refining the Damage
To level the bricks back out I blended (add/linear dodge) the results from the Main Damage section above to the results from the Initial Carving section, which looks like this:

To add in more detail, I took the Tile Sampler from the Main Damage Section and fine-tuned the appearance with more Directional Warps, Slope Blurs, and Edge Detect nodes and used a Blend node to multiply the results with the Blend node from above. From there I blended in a mixture of Gaussian Spots, Cloud Noise, and a Grunge Map to get the below result:

Adding Grain

This was a simple pass of just blending together different versions of B&W Spots and overlaying them onto the results from the last section.

To better see the effects, here is a side-by-side comparison of the results from the Refining the Damage section (left) and the results of adding more grain (right). It's subtle, but makes all the difference.

Without Grain

With Grain
Mortar

To create the mortar between the bricks, I added together some Grunge Spots and Grunge Concrete and plugged the results into the background input of a Blend node. The foreground is the results of the Grain section above. The opacity input is a Histogram Scan connected to the results of the Basic Pattern in order to keep the definition of the individual bricks.


For the basecolor I used a combination of Histogram Scan, Uniform Color, B&W Spots, and Blend nodes to get the same brown and yellow-ish color variation from my reference image.

To create the roughness, I pulled from the final height map from the Mortar section, used a Uniform Color node to replace the black levels with a light grey, and blended that with a Gradient Map pulled from a Flood Fill Gradient node in the Damage Refining section to get a little roughness variation in the mortar vs. the actual bricks.
Final Material

